Second steps with the Android SDK
This is part 2 of my journey into Android App development. Part 1 can be found here.
Let’s make an Android app!
Open Android Studio and start a new project. Give it a name. Choose the minimum API level of Android 4.4 KitKat, so that we can support most devices out there. Lastly, select “Empty Activity” as your starting template, accept defaults, and create your project. This sets up the app to launch with MainActivity as it’s default.

The project will take a couple minutes to initialize, but once it does, run it! Click the run button (or ctrl+option + R) and launch your program on either your connected device, or an emulator device you previously installed. Voila! Hello World!
Once your project is built, examine your “Project” file tree (look on the left side of the program for “Project” view. Your tree should look like mine below. The two most important files at this point are MainActivity.java and activity_main.xml. These are modified to launch an “Empty Activity” but are still connected via the onCreate() method in MainActivity.java.

The file activity_main.xml will eventually contain all the code for your app’s main screen. Here’s what the code and layout should look like:


Note that when viewing activity_main.xml, there are two tabs at the bottom of the file that allow you to choose “Design” or “Text” — find those tabs and switch back and forth between them. Your code and mock-up should be similar to mine as shown here. Also notice that in the “Text” view, there is a panel on the right-hand side of Android Studio that says “Preview”. You can preview the app while you write code.
So, what does this code mean?
We have a <RelativeLayout> opening tag that tells the layout to match_parent for the width and height. In this case, that means set the layout size to the whole screen. <RelativeLayout> is our parent element.
Inside the <RelativeLayout> we have a <TextView> child element that has width and height set to “wrap_content” and text set to “Hello World.” This means that the TextView element will only be as big as required by the content “Hello World”
Let’s modify the appearance. Find a background image you’d like to use for your app and put it in the drawable resources folder MyAppRoot/app/src/main/res/drawable.
Within <RelativeLayout>, type <ImageView and hit enter — the default values should populate. Style your <ImageView>… here’s what I did for mine:
<ImageView
    android:layout_width="match_parent"
    android:layout_height="match_parent"
    android:scaleType="centerCrop"
    android:src="@drawable/plaid_tile"
android:alpha="0.5"/>- the layout_width and layout_height set my image to match the entire screen, because they inherit the same width and height as our <RelativeLayout>… which inherits from the Activity itself
- the scaleType tells android to zoom in on my image center and keep the aspect ratio the same, until the image fills the screen. You may need to crop your image to get the desired effect
- the src tells the app where to pull the image… @ refers to an app resource, and drawable is the folder where you just put it. My image name is plaid_tile.xml (I made a tiled image… details here). Tell android where your image is, and omit the file extension
- lastly, I decided I want to fade my image. The alpha property sets transparency of everything on the screen at that time
Important: Views will draw over each other!
Place your <ImageView> as the first child of your <RelativeLayout> in order to render other Views on top of it. Otherwise, your screen-sized image will draw over your other elements.
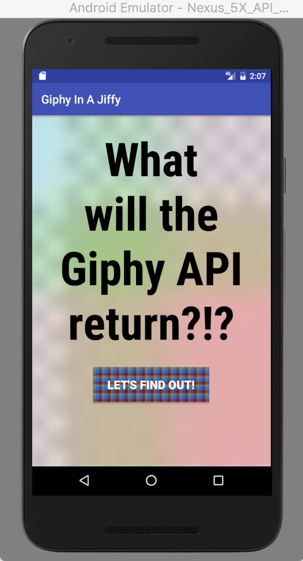
Do you see your image? Great! If not, keep troubleshooting until you have success! Here’s what mine looks like after modifying my <TextView> and adding a <Button>:
So how did I get my text to look like that? Let’s take a look at the attributes that make the text appear this way:
<TextView
    android:id="@+id/question"
    android:layout_width="match_parent"
    android:layout_height="wrap_content"
    android:layout_marginTop="20dp"
    android:textSize="80sp"
    android:textStyle="bold"
    android:textAlignment="center"
    android:fontFamily="sans-serif-condensed"
    android:text="What will the Giphy API return?!?"
android:textColor="#000000"/>- id: I assigned an id to my <TextView> so that I can position my button relative to my text… more on that when we look at the <Button> code
- layout_marginTop (one of 4 parts to layout_margin): accepts n as an argument of density-independent pixels (dp), which means your spacing stays consistent on ultra-high resolution as well as regular screens
- text___ : lots of attributes to change text… check them out here
And my <Button> code:
<Button
    android:layout_width="200dp"
    android:layout_height="60dp"
    android:layout_below="@id/question"
    android:layout_margin="25dp"
    android:layout_centerHorizontal="true"
    android:background="@drawable/plaid_button"
    android:textColor="#ffffff"
    android:textStyle="bold"
    android:textSize="20sp"
android:text="Let's Find Out!" />- layout______ : lots of ways to change the layouts of various things. Notice this is where I used the “@id/question” from my TextView above. Learn more about layout here
- notice a few similarities that I used earlier: the text attributes, and the background image (it works for buttons, too!)
If all of this is a bit overwhelming, I completely understand. Udacity has a really cool tool to explore Android View attributes. They even have images available to use on their tool, the Android Visualizer. Play around with the code snippets above, and read through the linked Google developer docs until you’re comfortable manipulating your own View items.
I hope that this post, the snippets, and the many links to Android developer docs are helpful. Check out my future posts to keep building onto your app!